Controlling DC motors with pyMCU and DRV8833 motor controller
DC motors can be found in many devices. In do-it-yourself projects they can be used to create robots like "smart" cars driving around and avoiding obstacles. Such motor can be turned on and off, and we don't get any control of the rotation speed or direction. To control such motors some controllers were designed. They take a shape of integrated circuit containing H bridges. You can find multiple driver boards on the market. They differ in the amount of supported motors, or their power. More powerful motors using more amps will require better, more expensive motor controllers. For cheap robot-sets for Arduino and alike you can usually use the weaker and cheaper controllers, or also boards that integrate motor controllers with other robotic features (some Arduino shields, RaspiRobot, Rover 5 etc.).
In this article I'll showcase Pololu DRV8833 dual motor driver controlled with pyMCU microcontroller. It one of cheaper drivers intended to use with weaker motors - just like those in small robots. Other motor controllers should work in very similar like if not identical way.

Pololu DRV8833
The board diagram is shown below. By default the pins won't be soldered so you will have to do it. Some experience may be handy as this board is very small.
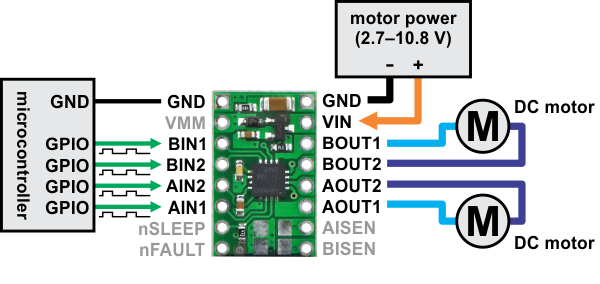
On the right side starting from the top we connect the power for the motors, and then up to two motors. On the left side we have the microcontroller ground (GND) pin as well two PWM pins per every motor (one pin controls rotation in one direction and the second one in opposite). When the board is working it may get really hot so be careful with it.
Microcontroller may tell the motor controller to turn motor on or off, control its speed and direction. It's done by Pulse width modulation - PWM. The microcontroller divides time into very short cycles. In every cycle a part of it the PWM pin may be in high or low state. Depending how much time of that cycle is high state it's possible to get any voltage between 0V and high state voltage (5V in case of pyMCU and Arduino). Motor controllers react to that value and increase or decrease power sent to the motor.
Controlling motor from pyMCU
pyMCU has 5 PWM pins so it can control two and a half motor in both directions... We connect everything as labeled on the DRV8833 board diagram. GND to GNT, two pins for motor power, two pins to the motor and two PWM pins to pyMCU.


When you connect everything nothing will happen. The microcontroller must turn the motor on. To do that we will have to play with the PWM pin on pyMCU like so:
from time import sleep

import pymcu

mb = pymcu.mcuModule()
mb.pwmOn(1)

for i in range(5, 10):
    mb.pwmDuty(1, i*100)
    sleep(2)

mb.pwmOff(1)
The script turns PWM on on pin 1 and then sets the "duty cycle" from 0 to 1023. Duty cycle is the part of the cycle in which the pin is in high state. The bigger value - the more power motor will get and it will rotate faster. For some setups the motor won't be able to move on low duty cycle values. This script increases duty cycle every two seconds so you should notice that the motor is going faster and faster until the PWM pin is turned off.
Second PWM controls opposite rotation in the same way as first pin.


Comment article