Django and Comet
Check out the new site at https://rkblog.dev.
14 July 2008
Comments
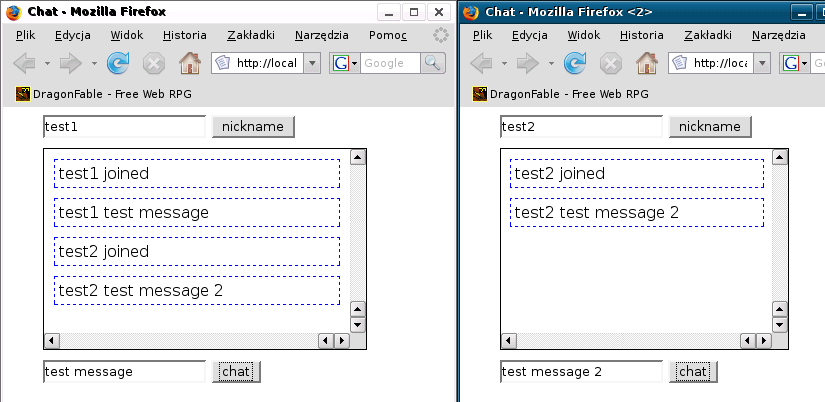
Using ajax you can make a chat, but you will have to send ajax requests to check if there are new messages to show - you can't make a real time application unless you use Java applet or Flash. However you can also use comet and make HTML/JS application real time. In Python we can use Orbited event driven comet server and django as the application "base". Start with installing orbited and pyorbited and their dependencies.
The basic solution of Comet powered application is to hide comet inside our web page handled by standard HTTP server. We can make a orbited.cfg config file in a folder from which we run orbited server with settings:
[global]
proxy.enabled = 1
proxy.keepalive = 0

[proxy]
/chat -> ORBITED
/ -> http://127.0.0.1:8080
Create a django project with with "chat" application. No database needed, just one template and some static files. Create chat.html template:
<!DOCTYPE html>
<html>
  <head>
    <meta charset="utf-8">
    <title>Chat</title>
    <script src="/_/orbited.js"></script>
    <script type="text/javascript" src="/site_media/ajaxroutine.js"></script>
    <link rel="stylesheet" href="/site_media/chat.css">
    <script src="/site_media/chat.js" charset="utf-8"></script>
  </head>
  <body>
    <input type="text" id="nickname">
    <input type="button" value="nickname" name="nickname" onClick="connect();">
    <div id="box"></div>
    <input type="text" id="chat">
    <input type="submit" value="chat" onClick="send_msg();">
    <iframe id="events"></iframe>
  </body>
</html>
body {
  margin-left:2em;
}

#box {
  border: 1px solid black;
  width: 80%;
  margin: .5em auto .5em 0;
  height: 10em;
  overflow: scroll;
}

.event {
  border: 1px dashed blue;
  margin: .5em auto;
  padding: .2em;
  width: 90%;
}

#events {
  display: none;
}
function processGetPost()
	{
	var myajax=ajaxpack.ajaxobj
	var myfiletype=ajaxpack.filetype
	if (myajax.readyState == 4)
		{ //if request of file completed
		if (myajax.status==200 || window.location.href.indexOf("http")==-1)
			{ //if request was successful or running script locally
			if (myfiletype=="txt")
			alert(myajax.responseText)
			else
			alert(myajax.responseXML)
			}
		}
	}


function connect()
{
  var nick = document.getElementById('nickname').value;
  Orbited.connect(chat_event, nick, "/chat", "0");
  ajaxpack.getAjaxRequest("/join/" + nick + "/", "", processGetPost, "txt");
}


chat_event = function(data) {
  var chat_box = document.getElementById('box');
  var div = window.parent.document.createElement('div');
  div.className = "event";
  div.innerHTML = data;
  chat_box.appendChild(div);
  chat_box.scrollTop = chat_box.scrollHeight;
}

function send_msg() {
  var msg = document.getElementById('chat').value;
  var nick = document.getElementById('nickname').value;
  ajaxpack.getAjaxRequest("/send/" + nick + "/" + msg + "/", "", processGetPost, "txt");
}
urlpatterns = patterns('',
(r'^site_media/(.*)$', 'django.views.static.serve', {'document_root': 'ścieżka/do/plików_staycznych'}),
(r'^join/(?P<nick>[\w\-_]+)/', 'chat.views.add_nick'),
(r'^send/(?P<nick>[\w\-_]+)/(?P<msg>.*)/', 'chat.views.send_msg'),
(r'^/?$', 'chat.views.chat_page'),
)
from pyorbited.simple import Client

from django.shortcuts import render_to_response
from django.conf import settings
from django.http import HttpResponse

users = []
orbit = Client()

def chat_page(request, users=users, orbit=orbit):
	"""
	Main view, show the template
	"""
	return render_to_response('chat.html', {})

def add_nick(request, nick, users=users, orbit=orbit):
	"""
	Add a user to the orbited user-client list
	"""
	users.append((nick, '0'))
	orbit.event(user_k(), '%s joined' % nick)
	return HttpResponse("ok")

def send_msg(request, nick, msg, users=users, orbit=orbit):
	"""
	Send message
	"""
	orbit.event(user_k(), '%s %s' % (nick, msg))
	return HttpResponse("ok")

def user_k(users=users):
	"""
	Create a user-client list for orbited
	"""
	lista = ["%s, %s, /chat" % (user[0], str(user[1]))
		for user in users]
	return lista
RkBlog
Check out the new site at https://rkblog.dev.


Comment article